

LuxeLine Brochures – Gatefold Template Tips
We offer many various sized brochures. Often you may find yourself using one particular size and type as your main design, however from time to time, often based on your listing, another size might bring more value as far as print collateral goes. We offer some of these as pre designed templates that you can use as a starting point. Just replace existing placeholder photos and text with your own or maybe you pick an choose what you want to keep and then add your own layout ideas. Either way its good to have an idea of how the template relates page wise to the actual brochure
Our Gatefold Brochure and Mailer Templates
We offer 2 sizes of gatefolds for property/ listing type brochures and 3 sizes for direct mail marketing. All however share the same layout and design concepts as well as having the same template characteristics as well.
QUICK NOTE: All brochures are a continuous single sheet of cardstock/paper that are folded in some manner. Booklets and Books will be multiple pages bound together by some form of bunding.
A gatefold (actually the printing term for our product is a closed double gatefold) has 8 panels or pages or sections. (4) on each side.

Then based on how we fold that sheet, it create a brochure
- That when folded has a front and back cover.
- First opens up
- Then opens up again to its flat size.
Important Detail
The ideal application for this is to best exhibit an impressive image or photo when the reader first opens it. Often a large image so you have to make sure the resolution is very high at a large size. Ask your photographer for the largest size you can get for that photo or photos. We recommend a 11"x17" photo with a dpi no less than 280. Taking a smaller photo and expanding it will not work for this one.
Online Design Tool
In our online design tool we have the templates set up so you don't have to worry about any page configuration or of the folds etc.
- We use 4 Design Space Pages.
- Each features 2 panels/pages combined.
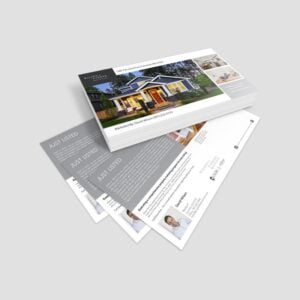
Design Space Page 1 - Back/Front Covers
We place the covers in one single page with the Front Cover on the right and the Back Cover on the left.
For most templates, the property address if often placed on the front cover and on the back cover the agent information, contact details, brokerage identification, etc.
Some templates use the cover to feature a large or wide property photo and then use minimal text that acts as a transparent overlay, Thus here you place one large photo on both pages. You will just upload and place one large photo.
Design Space Page 2 - The Gate
These two panels or pages represent what the reader first sees when opening the brochure. The brochure is then opened again form the middle this page. However you do not have to concern yourself with that aside from the fact that you do not want any important details to placed in the center. There will be a small gap here so that the brochure can fold correctly.
- Example: f this is a front elevation photo and the house number is centered in the gate line area it will not meet perfectly there are some tolerances. try to stay conscious of what is in the middle. (we do offer graphic design services that better handle this if it is critical however there would be an additional fee)
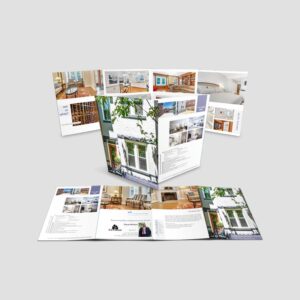
Design Space Page 3 - Inside Pages Left Side
This represent the area when the brochure is completely opened an starts from the left edge and thus, represent left half the inside content area.
Design Space Page 4 - Inside Pages Left Side
This represent the area when the brochure is completely opened an starts from the middle to the right edge, thus represent right half the inside content area.
Online Design Tool
In our online design tool we have the templates set up so you don't have to worry about any page configuration or of the folds etc.
- We use 4 Design Space Pages.
- Each features 2 panels/pages combined.
Design Space Page 1 - Back/Front Covers
We place the covers in one single page with the Front Cover on the right and the Back Cover on the left.
For most templates, the property address if often placed on the front cover and on the back cover the agent information, contact details, brokerage identification, etc.
Some templates use the cover to feature a large or wide property photo and then use minimal text that acts as a transparent overlay, Thus here you place one large photo on both pages. You will just upload and place one large photo.
Design Space Page 2 - The Gate
These two panels or pages represent what the reader first sees when opening the brochure. The brochure is then opened again form the middle this page. However you do not have to concern yourself with that aside from the fact that you do not want any important details to placed in the center. There will be a small gap here so that the brochure can fold correctly.
- Example: f this is a front elevation photo and the house number is centered in the gate line area it will not meet perfectly there are some tolerances. try to stay conscious of what is in the middle. (we do offer graphic design services that better handle this if it is critical however there would be an additional fee)
Design Space Page 3 - Inside Pages Left Side
This represent the area when the brochure is completely opened an starts from the left edge and thus, represent left half the inside content area.
Design Space Page 4 - Inside Pages Left Side
This represent the area when the brochure is completely opened an starts from the middle to the right edge, thus represent right half the inside content area.

Our Gatefold Brochure and Mailer Templates
We offer 2 sizes of gatefolds for property/ listing type brochures and 3 sizes for direct mail marketing. All however share the same layout and design concepts as well as having the same template characteristics as well.
QUICK NOTE: All brochures are a continuous single sheet of cardstock/paper that are folded in some manner. Booklets and Books will be multiple pages bound together by some form of bunding.
A gatefold (actually the printing term for our product is a closed double gatefold) has 8 panels or pages or sections. (4) on each side.
Then based on how we fold that sheet, it create a brochure
- That when folded has a front and back cover.
- First opens up
- Then opens up again to its flat size.
Important Detail
The ideal application for this is to best exhibit an impressive image or photo when the reader first opens it. Often a large image so you have to make sure the resolution is very high at a large size. Ask your photographer for the largest size you can get for that photo or photos. We recommend a 11"x17" photo with a dpi no less than 280. Taking a smaller photo and expanding it will not work for this one.
Online Design Tool
In our online design tool we have the templates set up so you don't have to worry about any page configuration or of the folds etc.
- We use 4 Design Space Pages.
- Each features 2 panels/pages combined.
Design Space Page 1 - Back/Front Covers
We place the covers in one single page with the Front Cover on the right and the Back Cover on the left.
For most templates, the property address if often placed on the front cover and on the back cover the agent information, contact details, brokerage identification, etc.
Some templates use the cover to feature a large or wide property photo and then use minimal text that acts as a transparent overlay, Thus here you place one large photo on both pages. You will just upload and place one large photo.
Design Space Page 2 - The Gate
These two panels or pages represent what the reader first sees when opening the brochure. The brochure is then opened again form the middle this page. However you do not have to concern yourself with that aside from the fact that you do not want any important details to placed in the center. There will be a small gap here so that the brochure can fold correctly.
- Example: f this is a front elevation photo and the house number is centered in the gate line area it will not meet perfectly there are some tolerances. try to stay conscious of what is in the middle. (we do offer graphic design services that better handle this if it is critical however there would be an additional fee)
Design Space Page 3 - Inside Pages Left Side
This represent the area when the brochure is completely opened an starts from the left edge and thus, represent left half the inside content area.
Design Space Page 4 - Inside Pages Left Side
This represent the area when the brochure is completely opened an starts from the middle to the right edge, thus represent right half the inside content area.